Client Management
Overview
The Client Management feature allows you to organize and maintain information about your business clients. This feature helps you store client details, track their status, and perform various management tasks efficiently.
Key capabilities include:
- Add new clients to your system
- View and search existing client information
- Edit client details when needed
- Manage client status (active/inactive)
- Export client data for reporting
- Import multiple clients using templates
Managing Your Clients
Viewing Client Information
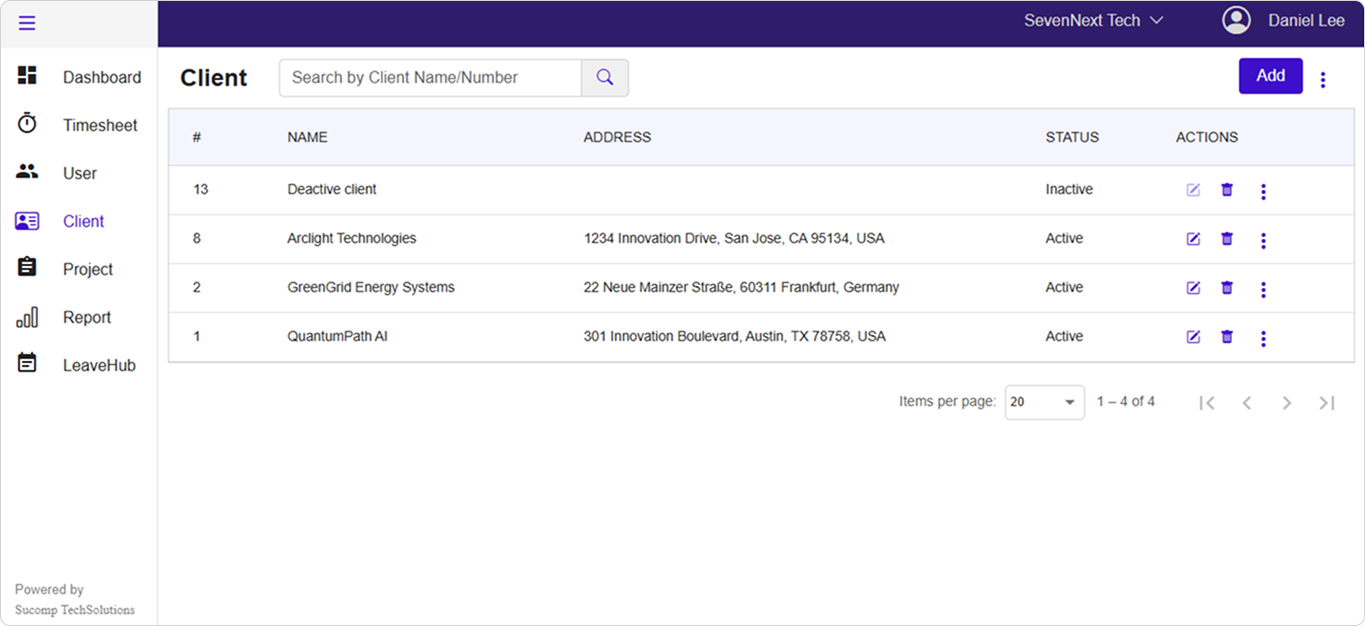
When you access the Client Management section, you'll see a complete list of all your clients displayed in a table format with the following information:
- Client Number (#): A unique identifier assigned to each client
- Client Name: The official name of the client organization or individual
- Address: The client's business or contact address
- Status: Shows whether the client is currently Active or Inactive
Searching for Clients
Use the search bar at the top of the page to quickly find specific clients:
Type the client name or client number in the search box
Results will appear automatically as you type
Search Examples
Search: "ABC Company"
Results: Shows all clients with "ABC" in their name

Search: "123"
Results: Shows the client with number 123
Adding a New Client
To add a new client to your system:
-
Click the "Add" Button Located in the top-right corner of the client list
-
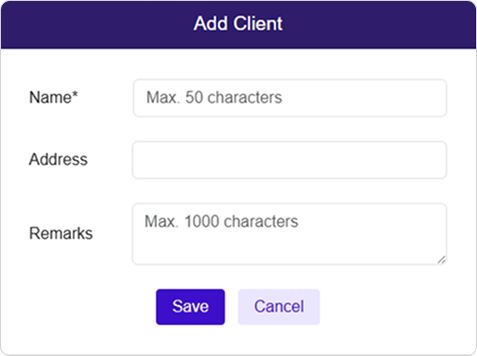
Fill in Client Details A form will open where you can enter:
- Client Name* (Required field)
- Address (Optional)
- Remarks (Optional notes about the client)
-
Save Your Changes
Click "Save" to add the client
OR
Click "Cancel" to close without saving
Success Confirmation : After successful client creation :
✅ Success message : "Client added successfully."
🔄 Client list updates to show the new client
📧 Client number is automatically assigned
Note
The client name is required and must follow proper formatting. Special characters and excessive length are not allowed.
Editing Client Information
To update existing client details:
-
Locate the Client Find the client in the list or use the search function
-
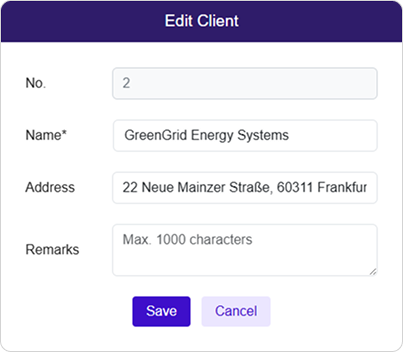
Click the Edit Button Look for the pencil icon in the Actions column
-
Update Information Modify any of the client details as needed
-
Save Changes Click "Save" to apply your updates
Pro Tip
You cannot edit clients that are marked as Inactive. You'll need to reactivate them first if changes are needed.
Client Status Management
Active vs Inactive Clients
Active Clients : Can be edited, assigned to projects, and used for normal business operations.
Inactive Clients : Cannot be edited or assigned to new projects, but their historical data remains accessible.
How to Deactivate a Client
-
Find the Client Locate the client you want to deactivate
-
Access More Actions Click the three dots (⋮) in the Actions column
-
Select Deactivate Choose "Deactivate Client" from the dropdown menu
-
Confirm the Action A confirmation dialog will appear - click "Yes" to proceed
Warning
Clients assigned to active projects cannot be deactivated. You must first remove them from all projects.
Removing Clients
To permanently delete a client:
-
Click the Delete Button Look for the trash icon in the Actions column
-
Confirm Deletion A warning dialog will ask you to confirm this permanent action
-
Final Confirmation Click "Yes" to permanently remove the client
Warning
Deleted clients cannot be recovered. Ensure you have exported any important data before deletion.
Data Import and Export
Exporting Client Data
To download your client information:
-
Access Export Options Click the three dots (⋮) button at the top right
-
Select Export Choose "Export" from the dropdown menu
-
Download File Your browser will download an Excel file with all client data
Importing Multiple Clients
For adding many clients at once:
-
Download Template
- Click the three dots (⋮) button
- Select "Import Template"
- Save the Excel template to your computer
-
Fill Template Open the template and add your client information following the format provided
-
Upload Completed File
- Click the three dots (⋮) button
- Select the file upload option
- Choose your completed template file
Template Requirements
| Field | Requirements | Example |
|---|---|---|
| Client Name* | Required, letters and numbers only | ABC Corporation |
| Address | Optional, any format | 123 Business Street, City |
| Remarks | Optional notes | Preferred client since 2020 |
Troubleshooting
1. Cannot Edit a Client
Problem: The edit button appears grayed out or disabled
Possible Causes & Solutions:
🔍 **Check Client Status:**
   - Verify the client is marked as "Active"
   - Inactive clients cannot be edited

🔄 **Alternative Actions:**
   - Reactivate the client first if needed
   - Contact your administrator if you lack permissions
2. Error During Client Deletion
Problem: Deletion fails with an error message
Possible Causes & Solutions:
🔍 **Check Project Assignments:**
   - Remove client from all active projects first
   - Verify no pending timesheet entries exist

🔄 **Alternative Actions:**
   - Deactivate instead of deleting
   - Contact support for assistance with complex cases
| Error Message | Solution |
|---|---|
| "Client allocated to project" | Remove client from all projects before deleting |
| "Cannot deactivate client" | Check for active project assignments |
Best Practices
✅ **Do:**
- Keep client information up to date
- Use descriptive names for easy identification
- Regularly export data for backup purposes
- Deactivate instead of deleting when possible

❌ **Don't:**
- Delete clients with historical data
- Use special characters in client names
- Leave important fields blank
- Import without using the template format
🎯 **Organization Tips:**
1. Use consistent naming conventions
2. Include relevant location information in addresses
3. Add useful notes in the remarks field

📋 **Maintenance Tasks:**
- Review inactive clients periodically
- Clean up duplicate entries
- Update addresses when clients relocate
Conclusion
The Client Management feature provides a comprehensive system for organizing your business relationships. By following these guidelines, you can maintain accurate client records, streamline your workflow, and ensure your data remains organized and accessible.
Last Updated: September 11, 2025 Version: 1.0 Document Type: End User Guide