Task and Team Management
Overview
Task and Team Management are essential components of project management that allow you to organize work and coordinate team members effectively. These features help you break down projects into manageable tasks and assign the right people to complete them.
Key capabilities include:
- Create and manage detailed tasks for each project
- Build project teams by allocating users
- Track task and team member status
- Manage team leader assignments
- Release team members when work is complete
- Export task and team data for reporting
- Import multiple tasks and team members using templates
Understanding Task and Team Workflow
Before working with tasks and teams, it's important to understand how they integrate with the project lifecycle:
Note
Tasks and team management can only be performed by Global Administrators, or Team Leaders. Team members can view their assigned tasks and create timesheets accordingly.
Task and Team Workflow
🎯 **Complete Workflow:**
1. Project is created with basic details
2. Tasks are defined for the specific work to be done
3. Team members are allocated to the project
4. Team members create timesheets for their assigned tasks
Task Management
Viewing Project Tasks
Tasks are displayed within the project details screen, showing all work items for the selected project:
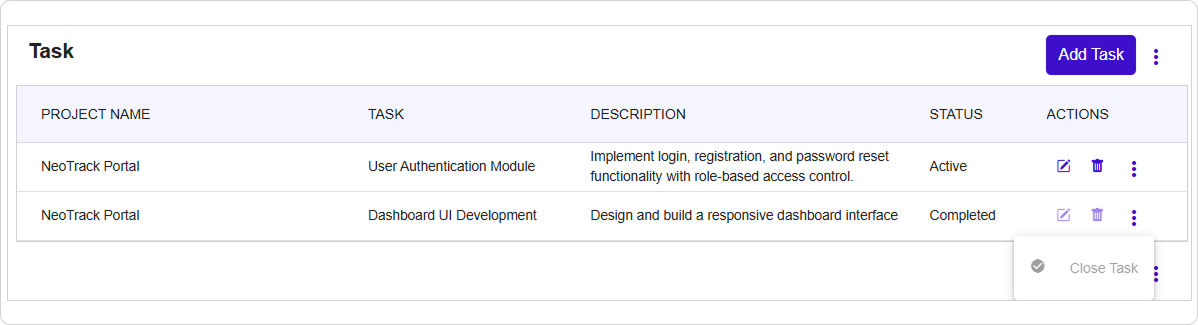
Task Information Displayed:
- Project Name: The project this task belongs to
- Task Name: The specific name of the work item
- Task Description: Detailed explanation of what needs to be done
- Status: Shows whether the task is Active or Completed
- Actions: Available operations (edit, delete, close)
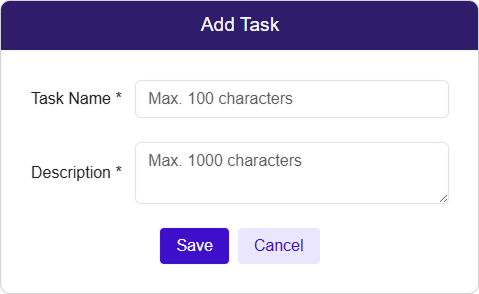
Adding New Tasks
Permission Required
Only Global Administrators and Team Leaders can add tasks to projects.
-
Navigate to Project Details Select the project from the project list to view its details
-
Access Task Section Look for the "Task" section within the project overview
-
Click Add Task Button Located in the top-right of the task section
-
Fill Task Information
- Task Name* (Required - descriptive name for the work)
- Description* (Required - detailed explanation of the task)
-
Save the Task
Click "Save" to create the task
OR
Click "Cancel" to close without saving
Success Confirmation : After successful task creation :
✅ Success message : "Task created successfully."
🔄 Task list updates to show the new task
📋 Task is now available for timesheet creation
Pro Tip
Use clear, descriptive task names that team members can easily understand. Include enough detail in the description so anyone can understand what work needs to be completed.
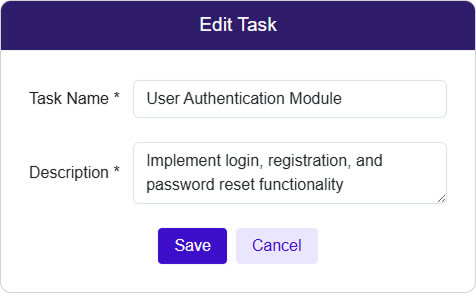
Editing Tasks
Modify existing task information when requirements change:
-
Locate the Task Find the task in the project's task list
-
Click the Edit Button Look for the pencil icon in the Actions column
-
Update Task Details Modify the task name or description as needed
-
Save Changes
Click "Save" to apply your updates
OR
Click "Cancel" to close without saving changes
Edit Restrictions
You cannot edit tasks that are marked as "Completed" or if the project is completed. Tasks can only be edited by authorized users with proper permissions.
Managing Task Status
Completing Tasks
When a task is finished, mark it as completed:
-
Access Task Actions Click the three dots (⋮) next to the task in the Actions column
-
Select Close Task Choose "Close Task" from the dropdown menu
-
Confirm Completion A confirmation dialog will ask you to verify the action
Success Confirmation : After successful task completion :
✅ Success message : "Task marked as complete successfully."
🔄 Task status changes to "Completed"
❌ No new timesheets can be created for this task
📊 Task completion contributes to project progress
Deleting Tasks
Permanent Action
Deleted tasks cannot be recovered. Only delete tasks that have no timesheet entries.
-
Click the Delete Button Look for the trash icon in the Actions column
-
Confirm Deletion A warning dialog will ask you to confirm this permanent action
-
Final Confirmation
Click "Yes" to permanently delete the task
OR
Click "No" to cancel the deletion
Task Data Management
![]()
Exporting Task Data
Download task information for reporting:
-
Access Export Options Click the three dots (⋮) button in the task section header
-
Select Export Choose "Export" from the dropdown menu
-
Download File Your browser will download an Excel file with task data
Importing Multiple Tasks
Add several tasks at once using a template:
-
Download Template
- Click the three dots (⋮) button in the task section
- Select "Import Template"
- Save the Excel template to your computer
-
Fill Template Open the template and add your task information following the format
-
Upload Completed File
- Click the three dots (⋮) button
- Select the file upload option
- Choose your completed template file
Team Management
Viewing Team Members
Team information is displayed within the project details screen, showing all allocated members:
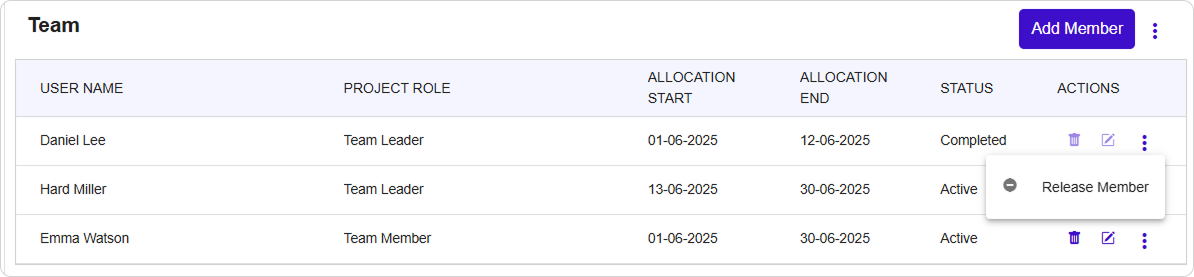
- User Name: First and last name of the team member
- Project Role: Role assigned (Team Leader or Team Member)
- Allocation Start: When the member starts working on the project
- Allocation End: When the member's assignment ends
- Status: Current allocation status (Active or Completed)
- Actions: Available operations (edit, delete, release)
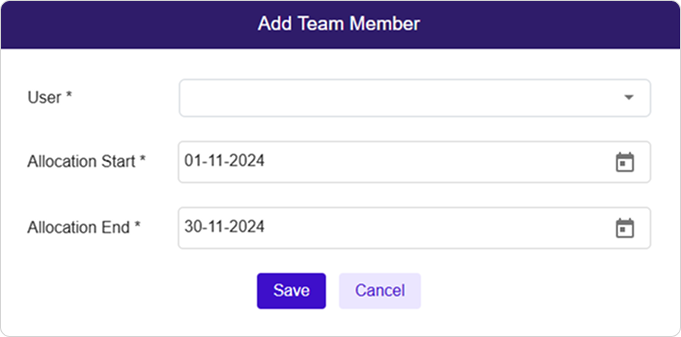
Adding Team Members
Assign users to work on the project:
-
Navigate to Project Details Select the project to view its team section
-
Click Add Member Button Located in the top-right of the team section
-
Select Team Member
- User* (Choose from dropdown of available users)
- Allocation Start Date* (When they begin working)
- Allocation End Date* (When their assignment ends)
-
Save Team Assignment
Click "Save" to add the team member
OR
Click "Cancel" to close without saving
Note
Allocation dates must fall within the project's timeline. The allocation end date must be after the start date.
Date Validation Rules:
- Allocation start date cannot be before project start date
- Allocation end date cannot be after project end date
- End date must be after start date
- Dates cannot overlap with existing allocations for the same user
Managing Team Allocations
Update allocation dates or details:

-
Find Team Member Locate the person in the team member list
-
Click the Edit Button Look for the pencil icon in the Actions column
-
Update Allocation Details
- Modify start or end dates as needed
- All date validation rules still apply
-
Save Changes
Click "Save" to apply updates
OR
Click "Cancel" to close without saving changes
Team Leader Management
Changing Team Leaders
When project leadership needs to change:

-
Access Team Actions Click the three dots (⋮) button in the team section header
-
Select Change Team Leader Choose "Change Team Leader" from the dropdown menu
-
Select New Leader
- Team Leader* (Choose from available users)
- Start Date* (When the new leader takes over)
-
Confirm Leadership Change
Click "Save" to change the team leader
OR
Click "Cancel" to keep current leader
What Happens During Leader Change:
- Old team leader's allocation is automatically ended (one day before new leader starts)
- New team leader is assigned with the specified start date
- This ensures continuous leadership without gaps
- Timesheet approval transfers to the new leader
Important Leadership Rule
There can only be one Team Leader per project at any given time. When a new leader is selected, the previous leader's allocation ends automatically.
Releasing Team Members
When team members complete their work early:
-
Access Member Actions Click the three dots (⋮) next to the team member
-
Select Release Member Choose "Release Member" from the dropdown menu
-
Confirm Release A dialog will ask you to confirm ending their allocation
Success Confirmation : After releasing a team member :
✅ Success message : "Team member released successfully."
🔄 Member status changes to "Completed"
📊 Member can no longer create timesheets for this project
🔄 Member becomes available for other project allocations
Removing Team Members
Permanent Action
This completely removes the team member from the project history.
-
Click the Delete Button Look for the trash icon in the Actions column
-
Confirm Removal A warning dialog will ask you to confirm this action
-
Final Confirmation
Click "Yes" to remove the team member
OR
Click "No" to cancel the removal
Team Data Management
![]()
Importing Multiple Team Members
Add several team members at once:
-
Download Template
- Click the three dots (⋮) button in the team section header
- Select "Import Template"
- Save the Excel template to your computer
-
Fill Template Add team member information including:
- User details
- Allocation start and end dates
- Project role assignments
-
Upload Completed File
- Click the three dots (⋮) button
- Select the file upload option
- Choose your completed template file
Allocation Rules and Restrictions
Date-Based Rules
Current System Date Impact:
🔍 **Allocation End Date Rules:**
1. If allocation end date is in the past (≤ current date):
    - This becomes the last working date for the team member
    - Member cannot create timesheets after this date

2. If allocation end date is in the future (> current date):
    - Member can continue working until the specified end date
    - Timesheets can be created up to the end date

📅 **Project Status Impact:**
3. When project is marked as completed:
    - All team allocations are automatically completed
    - No new timesheets can be created by any team members
    - Historical allocation data remains accessible
Team Leader Special Rules
Leadership Transition Process:
🎯 **Leader Change Process:**
1. Old team leader allocation ends 1 day before new leader starts
2. New team leader starts on specified date
3. This ensures no gap in timesheet approval authority
4. One person always has approval rights for any given day
Multi-Project Flexibility
🔄 **Cross-Project Roles:**
- A Team Leader of Project A can be a Team Member in Project B
- Users can have different roles across different projects
- Allocation dates can overlap across projects
- Each project maintains its own team structure
Troubleshooting
1. Cannot Add Tasks or Team Members
Problem: Add buttons are disabled or not working
Possible Causes & Solutions:
🔍 **Check Permissions:**
   - Verify you are a Team Leader, or Global Administrator
   - Ensure the project is still active (not completed)
   - Check if you have proper access to this specific project

🔄 **Alternative Actions:**
   - Contact Global Administrator for permission updates
   - Verify project status and reactivate if needed
2. Date Validation Errors
Problem: Cannot save tasks or team members due to date issues
Possible Causes & Solutions:
🔍 **Check Date Ranges:**
   - Ensure allocation dates fall within project timeline
   - Verify end date is after start date
   - Check for overlapping user allocations

🔄 **Alternative Actions:**
   - Adjust project dates if timeline needs to be extended
   - Modify allocation dates to fit within valid range
   - Remove conflicting allocations for the same user
3. Team Leader Change Issues
Problem: Cannot change team leader or errors occur during transition
| Error Scenario | Solution |
|---|---|
| "Overlapping leadership dates" | Ensure new leader start date doesn't conflict with current leader |
| "User already allocated" | Check if proposed leader is already assigned to this project |
| "Invalid transition date" | Select a future date for leadership change |
4. Task/Team Import Failures
Problem: Bulk import not working or showing errors
Possible Causes & Solutions:
🔍 **Check Template Format:**
   - Ensure you're using the correct template version
   - Verify all required fields are filled
   - Check date formats match system requirements

🔄 **Alternative Actions:**
   - Download fresh template and retry
   - Import smaller batches to identify problematic entries
   - Contact administrator for template assistance
Best Practices
✅ **Do:**
- Break large work items into smaller, specific tasks
- Use clear, descriptive task names and detailed descriptions
- Set realistic allocation dates with some buffer time
- Plan team leader transitions carefully to avoid gaps
- Regularly update task and team status
- Export data periodically for project reporting

❌ **Don't:**
- Create overly broad or vague tasks
- Assign team members outside project timeline
- Change team leaders frequently without good reason
- Delete tasks or team members with historical timesheet data
- Leave allocation end dates open-ended
- Forget to release team members when their work is complete
🎯 **Task Management Tips:**
1. Create tasks that can be completed within 1-2 weeks
2. Include acceptance criteria in task descriptions
3. Assign tasks that match team member skills
4. Monitor task completion rates for project progress

📋 **Team Management Tips:**
1. Plan overlapping allocations for knowledge transfer
2. Document team member responsibilities clearly
3. Communicate allocation changes to affected team members
4. Keep allocation dates updated as project scope changes
Conclusion
Effective Task and Team Management are crucial for project success. By properly defining work items and coordinating team assignments, you can ensure projects are completed efficiently and on schedule. Remember to follow allocation rules, maintain clear communication with team members, and regularly review progress to keep projects on track.
Last Updated: September 11, 2025 Version: 1.0 Document Type: End User Guide