User Management in Timesheet
Overview
The User Management module is your central hub for managing all users of your organization within the timesheet application. User in context of timesheet application is an employee or a staff member of the organization. This comprehensive module allows administrators to:
- Add and manage users with different roles and permissions
- Send invitation emails to add new users automatically
- Track user status (Active/Inactive) and project assignments
- Import/Export user data for bulk operations
- Copy users from platform with access to other applications but not to Timesheet application
- Monitor pending invitations and resend when needed
Pro Tip
Your available features may vary based on your user role (Global Administrator, Project Administrator, or Normal User).
Adding Users
-
Open Add User Dialog
Click the "Add" button in the top-right corner -
Fill User Information
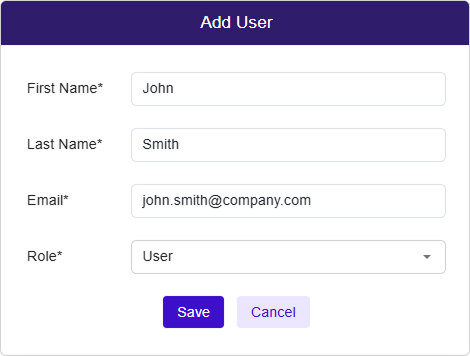
Complete the following required fields:
| Field | Requirements | Example |
|---|---|---|
| First Name* | Letters only, max 50 chars | John |
| Last Name* | Letters only, max 50 chars | Smith |
| Email* | Valid email, max 50 chars | john.smith@company.com |
| Role* | Select from dropdown | User or Project Administrator |
Note
Fields marked with * are required
- Submit the Form
Click "Send Invite" to create user and send invitation email
OR
Click "Cancel" to close without saving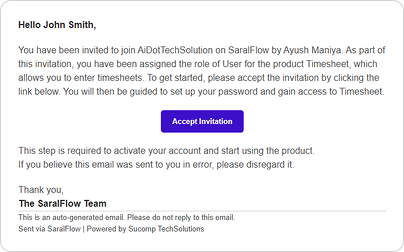
Success Confirmation : After successful user creation :
✅ Success message : "Invitation Link successfully sent to the user."
📧 Invitation email sent automatically to the user
🔄 User list refreshes to show the new entry in "Invited Users" tab
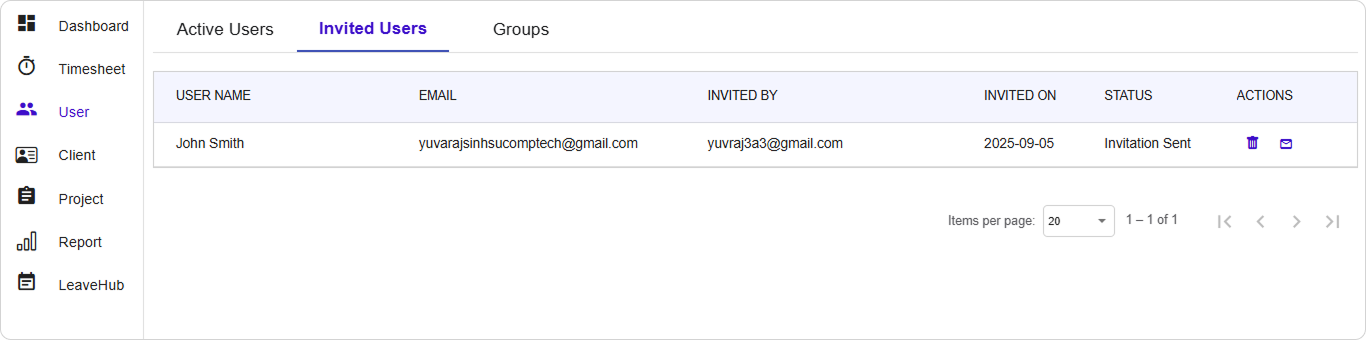
Invited Users
The Invited Users tab shows all pending user invitations.
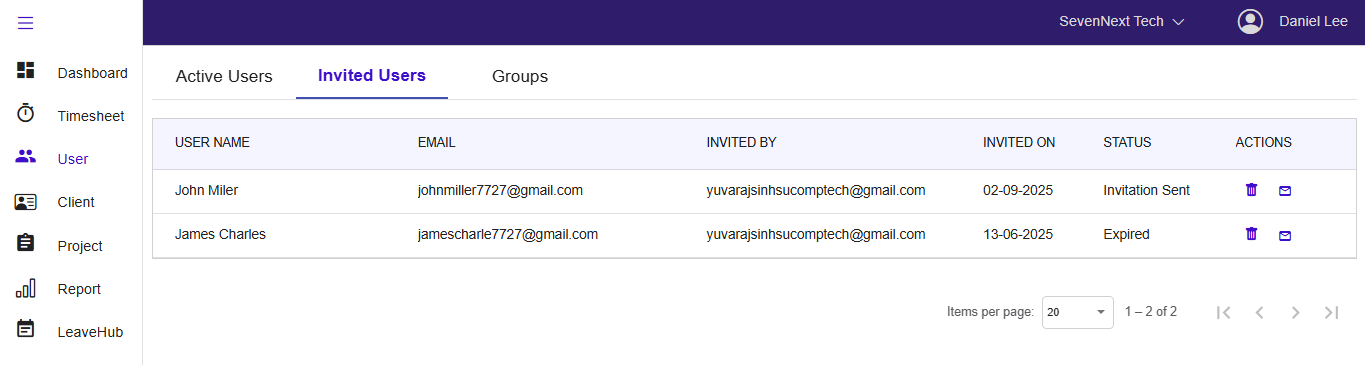
Invitation Status Types
- Invitation Sent: Email sent, awaiting user response
- Expired: Invitation has timed out (if applicable)
Resending Invitations
Sometimes users don't receive or lose their invitation emails.
How to Resend
- Locate the User in the Invited Users tab
- Click the mail icon (📧) next to their name under the Actions column
- Confirm the action if prompted
- Success confirmation appears
When to Resend
- Original Invitation link is expired
- User reports not receiving the invitation email
- Original email went to spam/junk folder
- Invitation email was accidentally deleted
Pro Tip
Before resending, ask the user to check their spam/junk folder first.
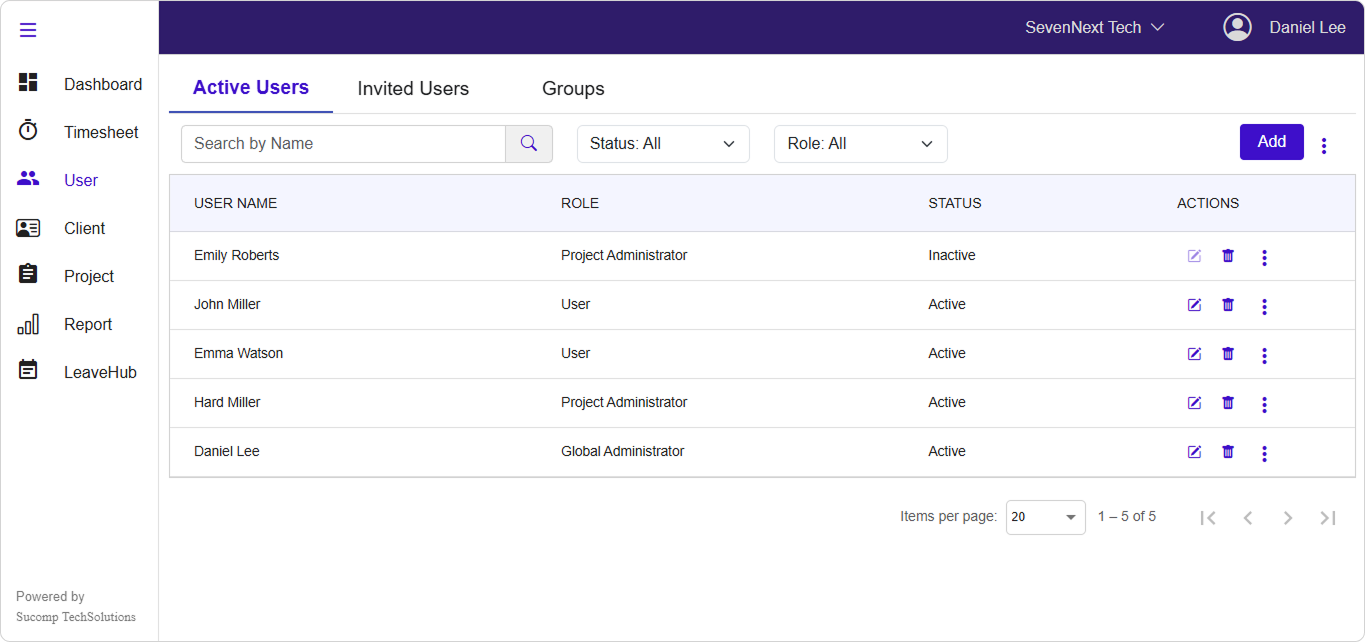
Viewing Users
The Active Users tab displays all confirmed users in your system.
- User Name : First and last name combined
- Role : User's assigned role(s)
- Status: Active or Inactive indicator
- Actions: Available operations (Edit, Delete, More options)
Search and Filtering
How to Search by Name
- Locate the search box in the top-left area
- Type the user's name (first or last name)
- Results filter automatically as you type
- Search is case-insensitive and matches partial names
Search Examples
Search: "john"
Results: John Smith, Johnny Doe, Johnson Miller

Search: "smith"
Results: John Smith, Sarah Smith, Mike Smith
Search Tips
- Search works on both first and last names
- Partial matches are supported
- Special characters and numbers are ignored
- Clear the search box to show all users again
Filter by Status : Below are the available status options
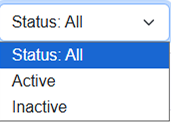
How to Use Status Filter
- Click the Status dropdown
- Select desired status:
- All: Shows both active and inactive users
- Active: Shows only active users
- Inactive: Shows only deactivated users
- Results update immediately
How to Filter by Role
Note: Role filtering is only available to Global Administrators.
- Click the Role dropdown
- Select specific role from the list:
- All: Shows users with any role
- Global Administrator: Shows only global admins
- Project Administrator: Shows only project admins
- User: Shows only regular users
- Results update automatically
Role-Based Visibility
👨💼 Global Administrator:
- Can filter by any role
- Sees all users regardless of role
👨💻 Project Administrator:
- Role filter not available
- Only sees users with "User" role
Combined Filtering
Filters work together to narrow results:
Example: Search="john" + Status="Active" + Role="User"
Result: Shows only active users named John with User role
Editing User
-
Locate the User
- Use search or filters to find the specific user
- Look for the edit icon (✏️) in the Actions column
-
Open Edit Dialog
Click the edit (pencil) icon next to the user's name -
Modify Information
- Editable fields: First Name, Last Name, Role
- Non-editable field: Email (grayed out for existing users)
- Make your changes in the form
-
Save Changes
Click "Save" to update user information
OR
Click "Cancel" to discard changes
Edit Restrictions
- Email addresses cannot be changed for existing users
- Inactive users cannot be edited (edit button will be disabled)
- Some roles may have restrictions on what they can edit
Deleting User
Warning
This action permanently removes the user and cannot be undone.
-
Initiate Deletion
Click the delete icon (🗑️) next to the user -
Confirmation Dialog
- Message: "Are you sure you want to delete this user?"
- Click "Delete" to confirm permanent removal
- Click "Cancel" to abort
-
Post-Deletion
- User is permanently removed from system
- All associated data may be affected
- Success message confirms deletion
Deactivate & Reactivate User
When to use: When you want to disable a user's access without losing their data.
-
Access Deactivate Option
Click the three-dot menu (⋮) → Select "Deactivate User" -
Confirm Action
- Review the confirmation dialog
- Click "Yes" to confirm deactivation
- Click "No" to cancel
-
Result
- User status changes to "Inactive"
- User cannot log in but data is preserved
- Can be reactivated later if needed
View Project Allocation
Track which project users are assigned to and their assignment duration.
Access Method
- Find the user in the Active Users table
- Click three-dot menu (⋮) next to their name
- Select "Project Allocation"
- View popup dialog with allocation details
Allocation Information Display
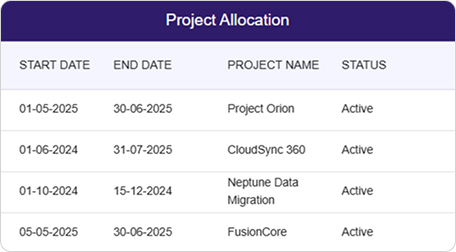
- Start Date: When the user was assigned to the project
- End Date: When the assignment ends/ended
- Project Name: Full name of the assigned project
-
Status: Current assignment status
➤ Active: Currently working on project
➤ Completed: Assignment finished
No Allocations Message
If a user has no project assignments:
💼 "User is not allocated to any project."
Use Cases for Project Allocation
- Workload Management: See how many projects a user is handling
- Resource Planning: Plan future assignments based on current load
- Historical Tracking: Review past project assignments
- Capacity Planning: Identify available users for new projects
Data Management
Export user data as Excel files for reporting and backup purposes.
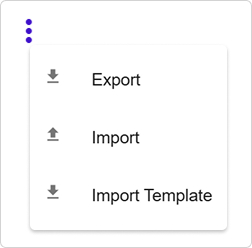
How to Export
-
Access Export Menu
Click the three-dot menu (⋮) in the top-right corner → Select "Export" -
Export Process
- File generates based on current filters
- Download starts automatically
- Default filename:
Userexport.xlsx
-
Export Content
- All visible user information
- Respects active filters (status, role, search)
- Formatted for spreadsheet applications
Export File Format
| First Name | Last Name | Email | Role | Status | Created Date |
|------------|-----------|--------|------|--------|--------------|
| John       | Smith     | john@... | User | Active | 2025-08-25   |
Export Permissions
- Global Administrator: Can export all users
- Project Administrator: Can export all users
- User: No export permissions
Bulk User Import
Import multiple users at once using Excel templates.
Step-by-Step Import Process
-
Download Template
Click three-dot menu (⋮) → Select "Import Template" Downloads: userimport.xlsx -
Prepare Your Data
- Open the downloaded template in Excel
- Fill in user information following the format
- Save the file
-
Template Format
| First Name* | Last Name* | Email* | Role* | |-------------|------------|---------|--------| | John | Smith | john@.. | User | | Jane | Doe | jane@.. | Admin | -
Upload File
Click three-dot menu (⋮) → Select file upload option Choose your completed Excel file -
Processing
- System validates all entries
- Invalid entries are reported
- Valid users are created and invited
Import Validation Rules
The system checks for:
✅ Required fields completed
✅ Valid email formats
✅ Existing email addresses (prevents duplicates)
✅ Valid role assignments
✅ Character limits respected
Handling Import Errors
Common issues and solutions:
| Error | Cause | Solution |
|---|---|---|
| "Email already exists" | Duplicate email address | Remove or change email |
| "Invalid email format" | Incorrect email syntax | Fix email format |
| "Role not found" | Invalid role name | Use exact role names |
| "Missing required field" | Empty required column | Complete all * fields |
Troubleshooting
Common Issues and Solutions
1. Cannot See Expected Users
Problem: User list appears empty or incomplete
Possible Causes & Solutions:
🔍 **Check Active Filters:**
   - Clear search box
   - Set status filter to "All"
   - Set role filter to "All" (if available)

👥 **Role-Based Visibility:**
   - Project Administrators only see "User" role users
   - Verify your role permissions

🔄 **Refresh the Page:**
   - Browser refresh (Ctrl+F5 / Cmd+Shift+R)
   - Clear browser cache if needed
2. Invitation Emails Not Received
Problem: Users report not receiving invitation emails
Troubleshooting Steps:
-
Check Email Address
Verify email spelling is correct in user record -
Check Spam/Junk Folders
Ask user to check spam/junk folders Add sender domain to safe senders list -
Resend Invitation
Use the resend invitation feature Wait a few minutes for delivery -
Email Server Issues
Contact IT support if problem persists
Check email server configuration
3. Import File Errors
Problem: Bulk import fails with validation errors
Common Issues & Fixes:
| Error Message | Solution |
|---|---|
| "Email already exists" | Remove duplicate emails from file |
| "Invalid role" | Use exact role names: "User", "Project Administrator", "Global Administrator" |
| "Missing required field" | Ensure First Name, Last Name, Email, and Role are filled |
| "Invalid email format" | Check email format: user@domain.com |
| "File format error" | Save file as .xlsx format |
4. Cannot Edit or Delete Users
Problem: Edit/Delete buttons are disabled or missing
Possible Causes:
🚫 **User is Inactive:**
   - Inactive users cannot be edited
   - Reactivate user first, then edit

🔐 **Permission Restrictions:**
   - You can only edit users you created (Project Admin)
   - Contact Global Administrator for assistance

👤 **System Users:**
   - Some system users cannot be deleted
   - These are protected accounts
5. Project Allocation Not Loading
Problem: Project allocation popup shows error or no data
Solutions:
1. **Refresh and Retry:**
   - Close popup and try again
   - Refresh the main page

2. **Check User Status:**
   - Inactive users may have limited allocation data
   - Contact administrator if needed

3. **Permission Check:**
   - Ensure you have rights to view this user's data
Getting Additional Help
If issues persist:
- Contact System Administrator
- Check Application Documentation
- Report Bug through proper channels
- Clear Browser Cache and try again
Best Practices
1. User Account Management
Creating Users
✅ **Do:**
- Use corporate email addresses
- Assign appropriate roles based on responsibilities
- Double-check email spelling before sending invites
- Use consistent naming conventions

❌ **Don't:**
- Use personal email addresses for business users
- Assign administrative roles unnecessarily
- Create duplicate accounts for the same person
Managing User Lifecycle
🎯 **New User Process:**
1. Create user with appropriate role
2. Verify invitation email is sent
3. Follow up if user doesn't activate within reasonable time
4. Provide orientation on system usage

🔄 **User Changes:**
- Update roles when responsibilities change
- Deactivate users who leave the organization
- Don't delete users unless absolutely necessary

📋 **Regular Maintenance:**
- Review inactive users quarterly
- Clean up expired invitations monthly
- Audit user roles and permissions regularly
2. Data Management Best Practices
Export Strategy
📊 **Regular Exports:**
- Export user data monthly for backup
- Keep historical snapshots for compliance
- Use filters to create targeted reports

🔒 **Security Considerations:**
- Secure exported files appropriately
- Don't share user data unnecessarily
- Follow data privacy regulations
Import Guidelines
📝 **Template Preparation:**
- Always use the latest template
- Validate data before importing
- Test with small batches first

✅ **Quality Control:**
- Remove duplicate entries
- Standardize role names
- Verify email formats
3. Permission Management
Role Assignment Strategy
🎭 **Role Guidelines:**
- Start with minimal permissions
- Increase access as needed
- Regular permission audits

👥 **Team Structure:**
- Global Admin: 1-2 people maximum
- Project Admins: Team leads/managers
- Users: All other team members
4. Communication Best Practices
User Onboarding
📧 **Invitation Process:**
- Send invites during business hours
- Follow up within 24-48 hours
- Provide system orientation for new users

💬 **User Communication:**
- Notify users before deactivating accounts
- Explain role changes when they occur
- Provide clear instructions for system access
5. Monitoring and Maintenance
Regular Tasks
🔍 **Weekly Tasks:**
- Review pending invitations
- Check for failed invitation deliveries
- Monitor new user activations

📅 **Monthly Tasks:**
- Clean up expired invitations
- Review user status and roles
- Export data for backup/reporting

🎯 **Quarterly Tasks:**
- Audit user permissions
- Review project allocations
- Update role assignments as needed
Performance Optimization
⚡ **System Performance:**
- Use filters to reduce data load
- Export large datasets during off-peak hours
- Clear browser cache periodically

📊 **Reporting Efficiency:**
- Use appropriate filters for exports
- Save commonly used filter combinations
- Schedule regular exports for consistency
6. Security Considerations
Account Security
🔐 **Best Practices:**
- Regularly review user access
- Promptly deactivate departed users
- Monitor unusual account activity
- Use strong role-based permissions

⚠️ **Red Flags:**
- Multiple failed login attempts
- Access from unusual locations
- Inactive accounts with recent activity
- Unusual data export patterns
Conclusion
This User Management guide provides comprehensive instructions for effectively managing users in your timesheet application. By following these guidelines and best practices, administrators can maintain a secure, organized, and efficient user management system.
Last Updated: August 25, 2025 Version: 1.0 Document Type: End User Guide