Project Management
Overview
The Project Management feature is the central hub for organizing and controlling all your business projects. This comprehensive system allows you to create projects, manage tasks, build teams, and track progress from start to completion.
Key capabilities include:
- Create and manage complete projects with timelines
- Define detailed tasks for each project
- Build and allocate team members to projects
- Track project status and progress
- Set budget hours and monitor resource allocation
- Export project data for reporting
- Copy existing projects to save setup time
Understanding Project Workflow
Before diving into the features, it's important to understand how projects work in this system:
Note
Projects can only be created by Project Administrators or Global Administrators. Regular users can view projects they're assigned to and submit timesheets for their allocated tasks.
Project Creation Process
🎯 **Project Workflow:**
1. Create Project with basic details and timeline
2. Add Tasks that need to be completed
3. Build Team by allocating users to the project
4. Users create and submit timesheets for their work
Viewing Your Projects
The main project screen displays all your projects in a table with the following information:
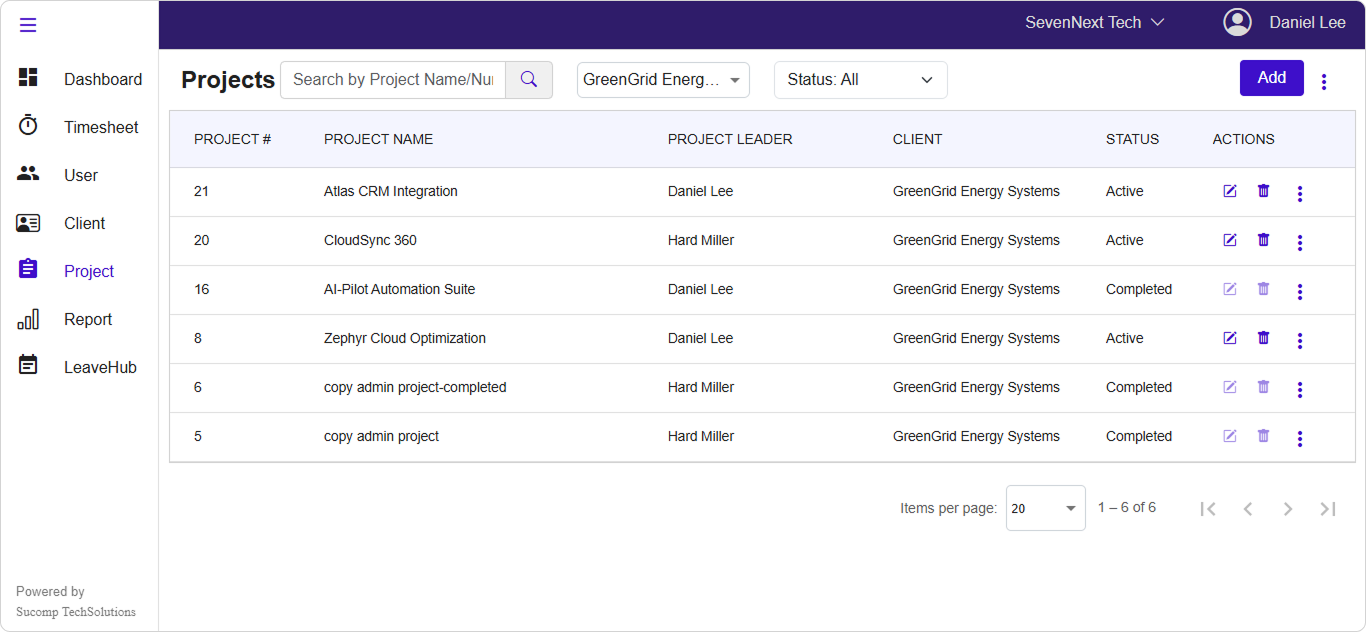
- Project Number: Unique identifier for each project
- Project Name: The official name of the project
- Team Leader: The person responsible for managing the project
- Client: The client organization for whom the project is being executed
- Status: Shows whether the project is Active or Completed
Searching and Filtering Projects
Basic Search Use the search bar to find projects by name or number:
Type the project name or project number in the search box
Results will appear automatically as you type
Client Filter Select specific clients to view only their projects:
-
Click the Client Dropdown Located next to the search bar
-
Select Clients You can choose multiple clients to filter by
-
View Results The project list updates to show only projects for selected clients
Status Filter Filter projects by their current status:
- All: Shows all projects regardless of status
- Active: Shows only ongoing projects
- Completed: Shows only finished projects
Creating a New Project
Permission Required
Only Project Administrators and Global Administrators can create new projects.
Creating a project involves three main steps that must be completed in order:
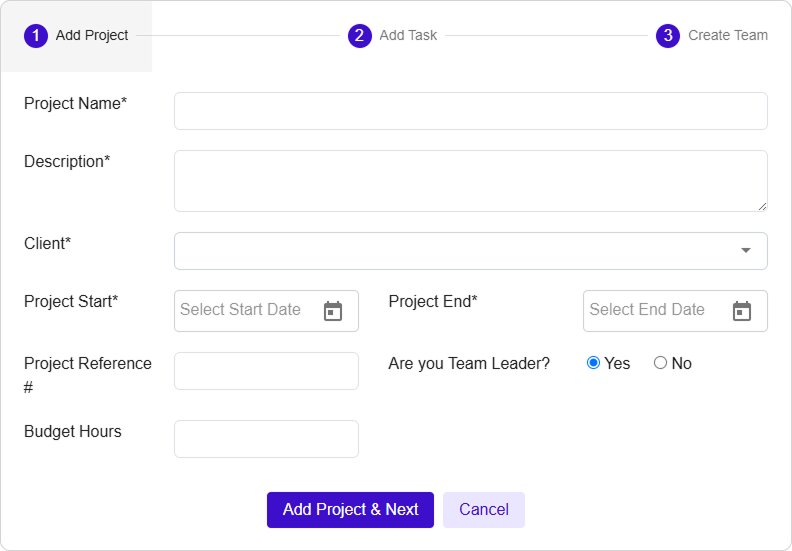
Step 1: Project Details
- Click the "Add" Button Located in the top-right corner of the project list
-
Fill in Basic Information
- Project Name* (Required)
- Project Description* (Required)
- Client* (Select from dropdown)
- Project Start Date* (Required)
- Project End Date* (Required)
- Reference Number (Optional)
- Budget Hours (Optional - numbers only)
-
Choose Team Leadership Answer the question "Will you be the Team Leader for this project?"
- Yes: You will be automatically assigned as the Team Leader
- No: You must select another user to be the Team leader
-
Click Add Project & Next to proceed to task creation. Click "Cancel" to close without saving any details.
Pro Tip
The project end date must be after the start date. Budget hours should only contain numbers - no letters or special characters.
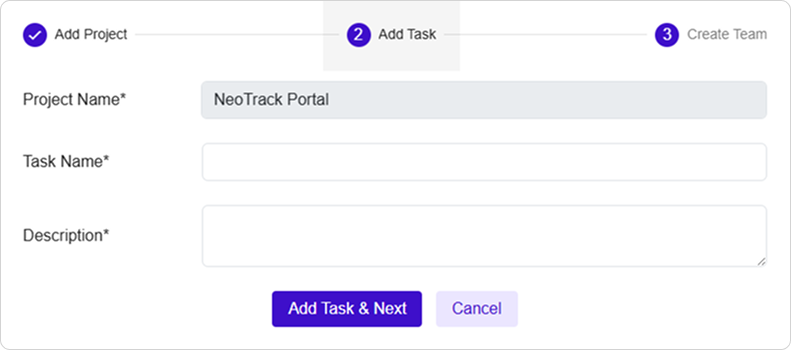
Step 2: Add Tasks
Tasks define the specific work that needs to be completed within the project:
-
Project Name Display The project name from Step 1 is automatically filled
-
Add Task Details
- Task Name* (Required)
- Description* (Required - detailed explanation of the task)
-
Click "Add Task & Next" to proceed to team creation
Note
Click on "Cancel" will create the project but neither task or team will be created.
Step 3: Create Team
Assign team members to work on the project:
-
Project Name Display The project name is automatically shown
-
Add Team Member
- User* (Select from dropdown of available users)
- Allocation Start Date* (When the user starts working on this project)
- Allocation End Date* (When the user's assignment ends)
-
Click "Submit" to complete project creation process
Note
- Click on "Cancel" will create the project and task but without any team member.
- The Team member allocation dates must fall within the project's start and end dates.
Success Confirmation : After successful project creation :
✅ Success message : "Project created successfully."
🔄 Project list updates to show the new project
📧 Project number is automatically assigned
🎯 Team members can now create timesheets for this project
Managing Existing Projects
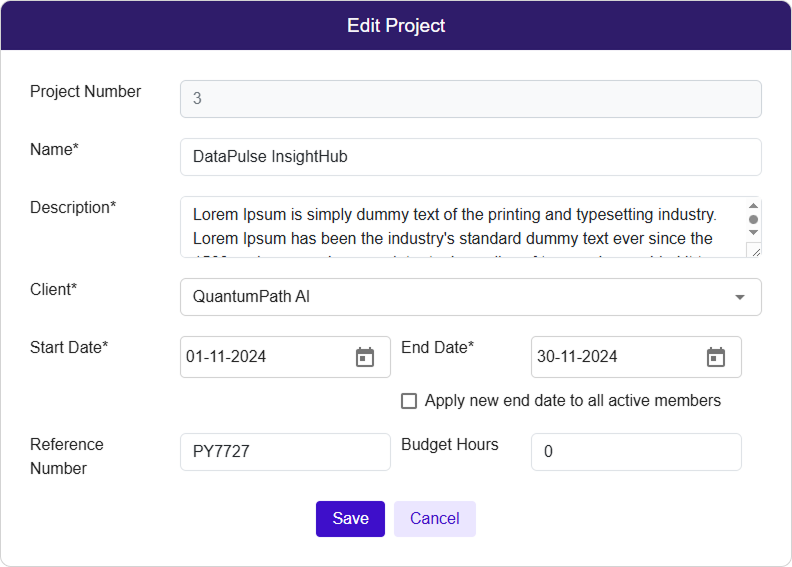
Editing Project Information
You can modify project details if you are the team leader or a global administrator:
-
Find Your Project Locate the project in the list or use search/filter options
-
Click the Edit Button Look for the pencil icon in the Actions column
-
Update Project Details Modify any of the following information:
- Project name and description
- Client selection
- Start and end dates
- Reference number
- Budget hours
- Team leader (if needed)
-
Apply End Date Changes If you change the project end date, you can choose to:
- Apply End Date to All: Updates allocation end dates for all active team members
- Keep Individual Dates: Maintains existing team member allocation dates
-
Save Changes
Click "Save" to apply your updates
OR
Click "Cancel" to close without saving changes
Edit Restrictions
- Only team leaders and global administrator can edit projects.
- Projects cannot be edited that are marked as "Completed".
Project Status Management
Completing a Project
When a project is finished, mark it as completed:
-
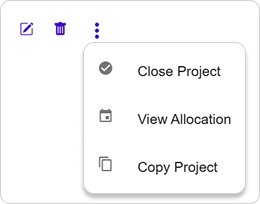
Access Project Actions Click the three dots (⋮) next to the project in the Actions column
-
Select Close Project Choose "Close Project" from the dropdown menu
-
Set Completion Date
- The current date is suggested as the completion date
- You can choose a different date if needed
-
Confirm Completion
Click "Confirm" to mark the project as complete
OR
Click "Cancel" to keep the project active
Success Confirmation : After successful project completion :
✅ Success message : "Project marked as complete successfully."
🔄 Project status changes to "Completed"
❌ No new timesheets can be created for this project
📋 Historical data remains accessible
Copying Projects
Save time by copying similar projects:
-
Access More Actions Click the three dots (⋮) in the Actions column
-
Select Copy Project Choose "Copy Project" from the dropdown menu
-
Enter New Project Name Provide a unique name for the copied project
-
Confirm Copy
Click "Confirm" to create the copy
OR
Click "Cancel" to close without copying
What Gets Copied
- Project details (description, client, dates)
- All project tasks
- Budget information
What Doesn't Get Copied
- Timesheets and work logs
- Team structure and allocations
- Project completion status
- Historical data
Viewing Team Allocation
See who is assigned to work on a project:
-
Access Project Actions Click the three dots (⋮) in the Actions column
-
Select View Allocation Choose "View Allocation" from the menu. This will display your own allocation history in the project.
-
Review Team Information A popup shows:
- Your name
- Your roles (Team Leader or Team Member)
- Allocation start and end dates
- Allocation status
Deleting Projects
Permanent Action
Deleted projects cannot be recovered. Only delete projects that have no timesheets saved or submitted.
-
Click the Delete Button Look for the trash icon in the Actions column
-
Confirm Deletion A warning dialog will ask you to confirm this permanent action
-
Final Confirmation
Click "Yes" to permanently delete the project
OR
Click "No" to cancel the deletion
Deletion Rules
- Projects with saved or submitted timesheets cannot be deleted
- Only team leaders and global administrators can delete projects
- Completed projects can be deleted if they have no timesheet entries
Data Management
![]()
Exporting Project Data
Download your project information for reporting or backup:
-
Access Export Options Click the three dots (⋮) button at the top right of the project list
-
Select Export Choose "Export" from the dropdown menu
-
Download File Your browser will download an Excel file with all project data
Importing Multiple Projects
Add several projects at once using a template:
-
Download Template
- Click the three dots (⋮) button at the top right
- Select "Import Template"
- Save the Excel template to your computer
-
Fill Template Open the template and add your project information following the format provided
-
Upload Completed File
- Click the three dots (⋮) button
- Select the file upload option
- Choose your completed template file
Troubleshooting
1. Cannot Create or Edit Projects
Problem: Add or Edit buttons are disabled or not visible
Possible Causes & Solutions:
🔍 **Check User Permissions:**
   - Verify you have Project Administrator or Global Administrator
   role
   - Contact your system administrator for permission updates

🔄 **Alternative Actions:**
   - Request another administrator to create/edit the project
   - Check if you're assigned as a team leader for editing
   specific projects
2. Project Creation Fails
Problem: Error occurs during the 3-step creation process
Possible Causes & Solutions:
🔍 **Check Required Fields:**
   - Ensure all mandatory fields are filled
   - Verify dates are valid and in correct order
   - Check that budget hours contain only numbers

🔄 **Alternative Actions:**
   - Review each step carefully before proceeding
   - Clear browser cache if forms are not working properly
3. Cannot Delete Project
Problem: Deletion fails with an error message
| Error Message | Solution |
|---|---|
| "Cannot delete this project" | Check for submitted timesheets and remove them first |
| "Access denied" | Verify you have appropriate permissions |
| "Project has associated data" | Contact administrator for assistance with complex deletions |
4. Team Member Allocation Issues
Problem: Cannot assign users to projects
Possible Causes & Solutions:
🔍 **Check Date Ranges:**
   - Verify allocation dates fall within project timeline
   - Ensure end date is after start date
   - Check for overlapping allocations

🔄 **Alternative Actions:**
   - Adjust project dates if needed
   - Remove conflicting allocations
   - Contact users about their availability
Best Practices
✅ **Do:**
- Plan project timelines carefully with buffer time
- Assign clear, descriptive task names
- Set realistic budget hours based on scope
- Regularly update project status
- Export data periodically for backup

❌ **Don't:**
- Delete projects with historical timesheet data
- Set unrealistic deadlines
- Leave required fields blank
- Assign users outside project timeline
- Create duplicate projects instead of copying
🎯 **Project Management Tips:**
1. Break large projects into smaller, manageable tasks
2. Allocate team members with overlapping periods for continuity
3. Use reference numbers for easy client identification
4. Review and update budget hours as project scope changes

📋 **Maintenance Tasks:**
- Review completed projects monthly
- Update team allocations when members change
- Clean up old test or duplicate projects
- Maintain consistent naming conventions
Conclusion
The Project Management feature provides a complete solution for organizing work from initial setup through completion. By following the three-step creation process and utilizing the various management tools, you can effectively coordinate teams, track progress, and deliver successful projects on time.
Last Updated: September 11, 2025 Version: 1.0 Document Type: End User Guide