Timesheet Creation
Overview
The timesheet creation system helps you track your daily work hours and tasks. This feature allows you to record when you start and finish work each day, along with detailed information about the projects and tasks you worked on.
Key capabilities include:
- Recording daily work hours with start and end times
- Adding multiple timesheet entries for the same day (for different work shifts)
- Tracking project-specific tasks with billable and non-billable hours
- Managing timesheet submissions and approvals
- Automatic calculation of working hours
Creating Your Daily Timesheet
Step 1: Access your Weekly Timesheet View
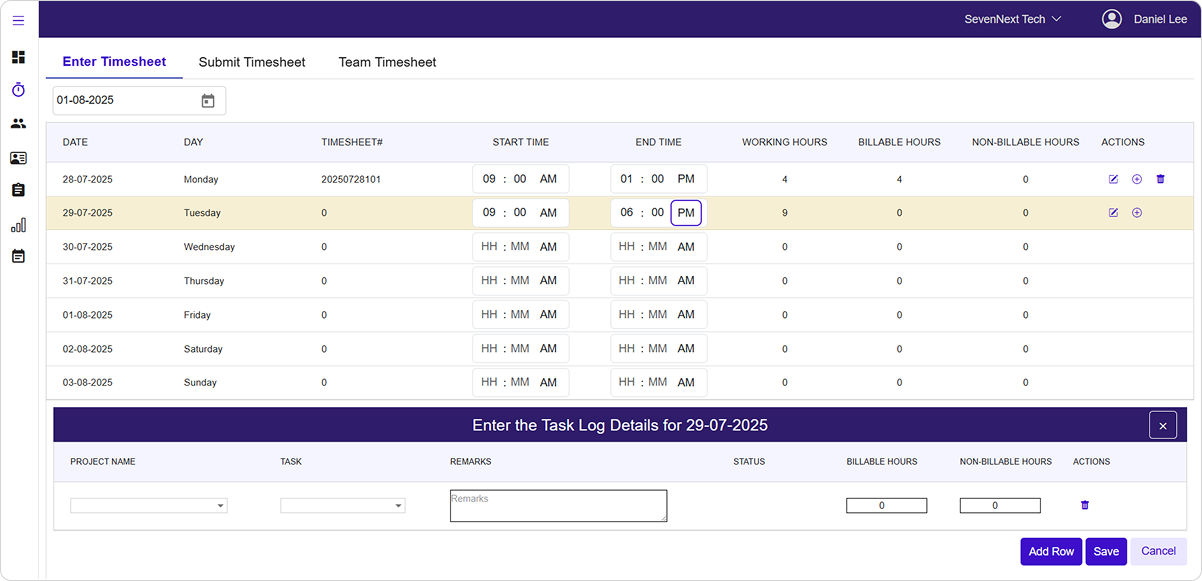
Navigate to "Enter Timesheet" tab present under "Timesheet" menu where you'll see a weekly view of your timesheet entries.
How this helps you: The weekly view gives you a complete picture of your work schedule, making it easy to spot missing entries or plan your time effectively.
-
Select Your Date
- Use the date picker at the top to choose the week you want to work on
- The system will automatically display Monday through Sunday for the selected week
-
View Your Weekly Schedule Your timesheet table shows the following information for each day:
- Date: The specific date of the timesheet entry
- Day: The day of the week
- Timesheet Number: A unique number assigned to each timesheet entry
- Start Time: When you began working
- End Time: When you finished working
- Working Hours: Total hours calculated automatically
- Billable Hours: Hours that can be charged to clients
- Non-Billable Hours: Hours for internal activities
Step 2: Add Your Work Hours
How this helps you: Recording accurate start and end times ensures proper time tracking and helps with project billing and payroll processing.
-
Set Your Start Time
- Click on the start time field for the day you want to update
- Select your work start time using the time picker
- The time picker shows hours and minutes with AM/PM format
-
Set Your End Time
- Click on the end time field for the same day
- Select when you finished working
- The system will automatically calculate your total working hours
-
Review Calculated Hours
- Working hours are calculated automatically when you enter both times
- The calculation appears immediately in the "Working Hours" column
- Hours are displayed with two decimal places for accuracy
Note
The system automatically validates that your end time is later than your start time. If there's an error, you'll see a message prompting you to correct the times.
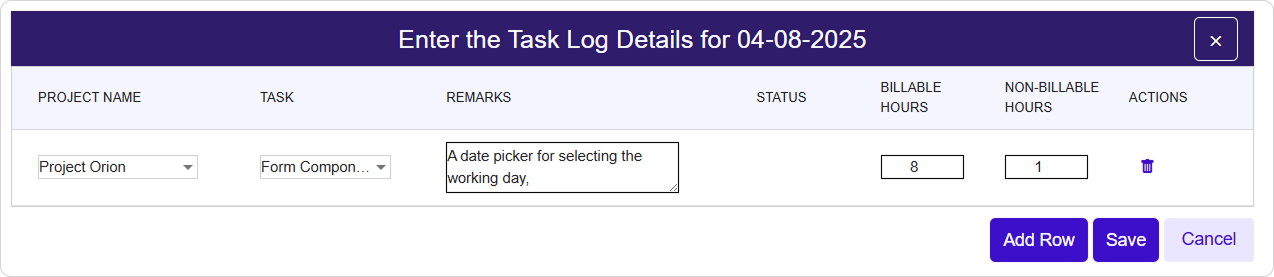
Step 3: Add Task Details
How this helps you: Adding detailed task information helps track project progress, ensures accurate billing, and provides transparency about how your time was spent.
After entering your work times, the system will open the task details panel automatically.
-
Select Your Project
- Choose from the dropdown list of projects you're assigned to
- Only projects where you have active allocations for that date will appear
- If you don't see a project, contact your team leader/manager to allocate project to you.
-
Choose Your Task
- After selecting a project, the task dropdown will populate with available tasks
- Select the specific task you worked on
- Tasks are organized by project for easy selection
-
Add Work Description
- In the "Remarks" field, briefly describe what you accomplished
- Include key activities, milestones reached, or issues encountered
- This information helps with project reporting and communication
-
Allocate Your Hours
Billable Hours: - Enter hours that can be charged directly to the client - Typically includes development, testing, meetings with clients, and project-specific work
Non-Billable Hours: - Enter hours for internal activities like training, team meetings, or administrative tasks - These hours count toward your total working time but aren't charged to clients
Important Validation
The sum of your billable and non-billable hours must equal your total working hours. The system will prevent saving if these don't match.
Step 4: Save Your Timesheet
How this helps you: Saving your timesheet ensures your work is recorded and can be used for project tracking, billing, and payroll processing.
-
Add Multiple Tasks (if needed)
- Click
Add Rowto add additional tasks for the same day - You can work on multiple projects or tasks within a single timesheet
- Each task entry can have different billable/non-billable hour allocations
- Click
-
Review Your Entries
- Verify that all project and task selections are correct
- Check that hour allocations match your actual work
- Ensure remarks accurately describe your activities
-
Save Your Work
- Click the
Savebutton to store your timesheet - The system will validate all entries before saving
- You'll receive a confirmation message when successful
- Click the
Pro Tip
Save your timesheet regularly throughout the day to avoid losing your work. You can always come back and edit entries before submitting them.
Add Intra-Day Work Sessions
How this helps you: If you have breaks in your workday or work multiple shifts, you can create separate timesheet entries to accurately reflect your schedule.
-
When to Add Multiple Entries
- You took a long break during the day (e.g., didn't work from 1 PM to 5 PM)
- You worked different shifts (morning and evening sessions)
- You need to separate different types of work activities
-
Creating Additional Entries
- Click the
 icon next to an existing timesheet entry
 - A new row will appear for the same date
- Enter start and end times for your additional work session
- Add task details for this separate time period
- Click the
-
Understanding Timesheet Numbers
- Each timesheet entry gets a unique timesheet number
- Multiple tasks within the same timesheet share the same number
- Different time sessions on the same day get different timesheet numbers
Edit Timesheet
Overview
The edit timesheet feature allows you to modify your existing timesheet entries quickly and efficiently. This feature is essential when you need to update work hours, change task assignments, or modify project details after your initial timesheet entry. You can edit both the time information (start time, end time) and task details (project, task, hours allocation) from a single interface.
-
Access Edit Mode Navigate to your timesheet view where you can see your daily entries for the week.
-
Edit Time Information
- Locate the timesheet entry you want to modify
- Click the edit icon
 next to the entry you want to change
 - Start Time: Use the time picker to adjust your start time
- End Time: Use the time picker to modify your end time
- The working hours will automatically recalculate when you change the times
-
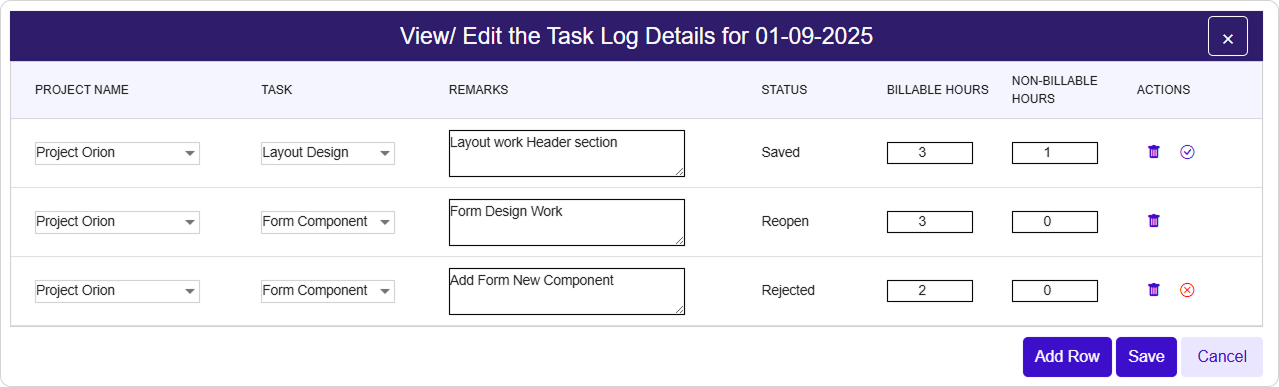
Edit Task Details When you click the edit button, a drawer panel will open with detailed task information:
- Project Selection: Choose from the dropdown list of available projects
- Task Assignment: Select the specific task from the project's task list
- Remarks: Add or modify comments about your work
- Billable Hours: Adjust the billable time for this task
- Non-Billable Hours: Modify the non-billable time allocation
-
Save Your Changes
- Click the
Savebutton to apply your modifications - Click
Cancelto discard changes and return to the main view
- Click the
Note
The total of billable and non-billable hours must equal your total working hours for the day.
Important
You cannot edit timesheets that have already been approved or submitted. Only saved, rejected or reopened timesheets can be modified.
Delete Timesheet
Overview
The delete timesheet feature allows you to remove timesheet entries that are no longer needed or were created by mistake. This helps maintain clean and accurate timesheet records. You can delete both individual task entries and entire timesheet days, depending on your needs.
Delete Individual Task Entries
 1. Access Task Deletion
When editing a timesheet entry (in the side panel):
- Locate the task row you want to remove
- Click the delete icon
1. Access Task Deletion
When editing a timesheet entry (in the side panel):
- Locate the task row you want to remove
- Click the delete icon ![]() in the Actions column
- The task will be removed from that day's timesheet
in the Actions column
- The task will be removed from that day's timesheet
- Confirmation Process
- The system will immediately remove the task entry
- If this was the only task for that time period, you'll need to add a new task or delete the entire timesheet entry
Delete Entire Timesheet Day

-
Access Day Deletion From the main timesheet view:
- Find the timesheet day you want to delete
- Click the delete icon
 in the Actions column
 - A confirmation dialog will appear
-
Confirmation Dialog It will ask for confirmation before executing the delete operation.
-
Complete the Deletion
- Click
Confirmto permanently delete the timesheet - Click
Cancelto keep the timesheet
- Click
Important Restrictions
- Approved Timesheets: Cannot be deleted once approved by management
- Submitted Timesheets: Cannot be deleted while pending approval
- Only Saved/Draft Timesheets: Can be deleted by the user
Delete Newly Added Rows

- Remove Unsaved Entries
If you added a new timesheet row but haven't filled in the times:
- Click the minus icon to remove the empty row
- This only works for newly added rows that don't have start and end times
- Click the minus icon
Success Confirmation
After successful deletion:
✅ Success message : "Timesheet deleted successfully."
🔄 Interface updates to reflect changes
📋 Weekly view refreshes automatically
Timesheet Validation
Overview
The timesheet validation system uses color coding to help you quickly identify the status and any issues with your timesheet entries. This visual feedback system ensures you maintain accurate records and helps you spot problems before submitting your timesheet for approval.
Understanding Color Codes
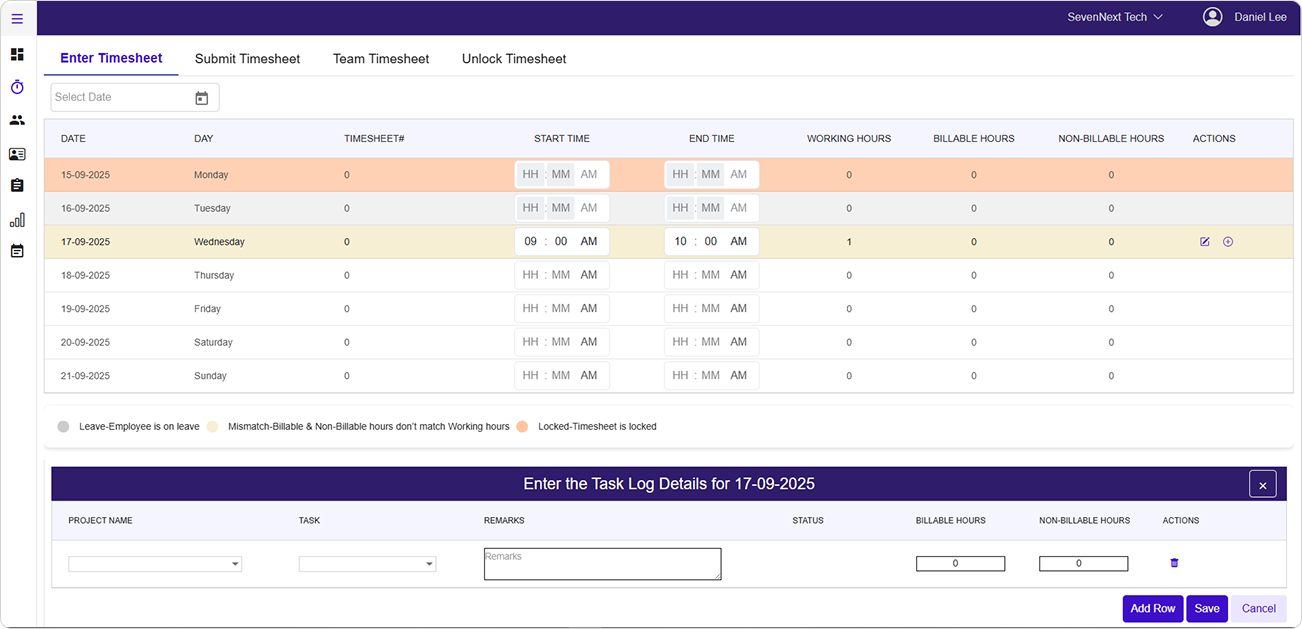
🟡 Yellow Highlighting
Timesheet row is highlighted in yellow whenever the total working
hours do not match sum of billable hours and non-billable hours.
What this means: - Your billable hours + non-billable hours ≠ total working hours - You need to adjust your time allocation to match your total working time - This prevents timesheet submission until resolved
How to fix:
- Check your total working hours (calculated from start and end time)
- Verify your billable and non-billable hours add up to this total
- Adjust the hours allocation as needed
🔘 Grey Highlighting
Timesheet row is highlighted in grey whenever a leave is applied by
team member on the same day through LeaveHub app. This is applicable
only if both the apps viz. Timesheet and LeaveHub are being used.
What this means:
- You have an approved or pending leave for this day
- Timesheet entry is disabled for leave days
- You cannot create or modify timesheet entries on leave days
- Leave need to be cancelled in order to enable creating timesheet
What you see:
- Disabled input fields for time entry
- Tooltip message: "You are on leave this day. Timesheet entry is disabled."
- All editing functions are blocked
Note
Timesheet is enabled on days declared as Holidays by the organization. Only those days where staff/team member has applied leave will be disabled for timesheet creation.
Validation Rules
⚠️ Time Validation
- End time must be later than start time
- Working hours must be greater than 0
- Start time and end time are required for saving
📊 Hours Validation
- Billable + Non-billable hours must equal working hours
- Individual task hours must be greater than 0 for submission
- Project and task selection is mandatory
📅 Date Validation
- Cannot create timesheets for future dates beyond today
- Cannot edit timesheets on leave days
- Cannot modify approved or submitted timesheets
Error Messages & Troubleshooting
Problem 1: "End time must be later than start time"
Solution:
- Check that your end time is set to a time after your start time
- Verify you selected the correct AM/PM setting
- Make sure times are entered in the correct fields
Problem 2: "Total working hours must equal the sum of Billable and Non-Billable hours"
Possible Causes & Solutions:
Hour Allocation Mismatch
- Check Your Math: Add up your billable and non-billable hours to ensure they match your total working hours
- Adjust Allocations: Modify your hour entries so the total equals your working hours
- Account for All Time: Make sure you've allocated all your working hours between billable and non-billable categories
Problem 3: "Please select both start time and end time"
Solution: - Ensure both start and end times are filled in - Click on the time fields to open the time picker - Select valid times for both fields before saving
Problem 4: "Please select project and task"
Solution: - Choose a project from the dropdown menu - After selecting a project, choose a task from the task dropdown - Ensure both fields have valid selections before saving
Best Practices
Recommended Practices
✅ **Daily Time Tracking:**
- Enter your timesheet data daily while activities are fresh in memory
- Record start and end times as close to actual work periods as possible
- Add task remarks immediately after completing work

✅ **Accurate Hour Allocation:**
- Be honest about billable vs. non-billable time distribution
- Include all work activities, even small tasks
- Round to the nearest 15-minute increment for consistency

✅ **Project Organization:**
- Group related tasks under the same timesheet entry when possible
- Use clear, descriptive remarks for each task
- Coordinate with project managers on time allocation expectations
❌ **Common Mistakes to Avoid:**
- Don't wait until the end of the week to fill in all your timesheets
- Don't estimate hours without considering actual time spent
- Don't leave remarks fields empty - they provide valuable project insights
- Don't forget to account for meeting time, planning, and other project activities
Status Indicators
Your timesheet entries will show different status indicators:
| Status | Description | What You Can Do |
|---|---|---|
| Draft/Saved | Timesheet saved but not submitted | ✅ Edit, delete, or submit |
| Submitted | Submitted for approval | ❌ Cannot edit until returned |
| Approved | Approved by team leader | ❌ Cannot edit or delete |
| Rejected | Returned with comments | ✅ View comments and resubmit after corrections |
Note
Once a timesheet is submitted, you cannot make changes unless it's rejected and returned to you for corrections.
Last Updated: September 2025 Version: 1.1 Document Type: End User Guide